
Here you will find all of your client's EBICS contacts. These contacts are required to submit payments and direct debits via EBICS and to retrieve transactions.

Add EBICS contact
You will find detailed instructions on how to set up new EBICS contacts here. Please note that you do not need to set up an EBICS contact if you only make payments via SRZ transfer - in this case only setting up bank accounts for SRZ is required.
Exporting and importing EBICS contacts
You can export an EBICS contact that has been set up and import it again in another client, saving you the time-consuming setup process.
The export and import of EBICS contacts for current windata products also works across the product range - i.e. if you use EBICS contacts already set up in other windata products such as windata professional or VEU-Portal, you can also import them into konfipay if necessary.
For export and import of EBICS contacts in konfipay you will find separate instructions here.
Manage EBICS keys
Under the item EBICS keys you can manage your client's EBICS keys in the toolbar. An EBICS key is used to authenticate a person authorized to sign during file transfer and retrieval via EBICS and during communication with the bank computer. Each EBICS key is protected by an EBICS password. You need an EBICS key so that you can use an EBICS contact.
This separate article describes how EBICS keys work and how they are managed in konfipay.
Edit EBICS contact
You can change the stored data of an EBICS contact even after it has been created by selecting the EBICS contact in the list and clicking on Edit. Only change connection data after consultation with your bank.

Automatic signature
For clients in which the konfipaySign module is activated, under Automatic signature, you can set whether VEU orders should be released automatically. You can find more information on this here.
EBICS connection settings
In the editing window of an EBICS contact, click on Connection at the top to change the connection settings for this contact. Here you can change the HTTP timeout (that is, how long confipay has to establish a connection to the bank server) and the SSL protocol (that is, the encryption protocol).
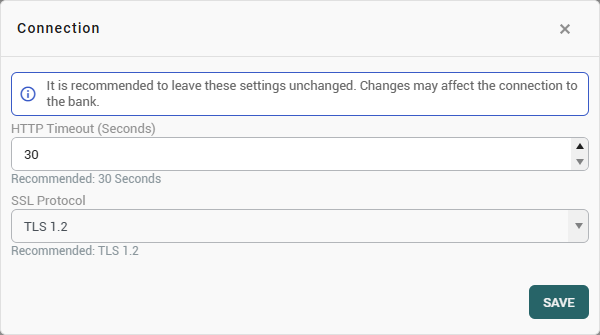
Please generally leave these settings at the recommended values. Changes should only be made here under special circumstances. Changes may affect the connection to the bank.
Change EBICS key
Once an EBICS contact has been created, you can no longer change the assigned EBICS key and replace it with another EBICS key. You can only edit the current EBICS key and change the user assignment or change or delete the password for the EBICS key. You can only delete an EBICS key completely in EBICS key management. However, all EBICS contacts that have used the EBICS key will then be reset to the status Not initialized and must be reinitialized with a new key.
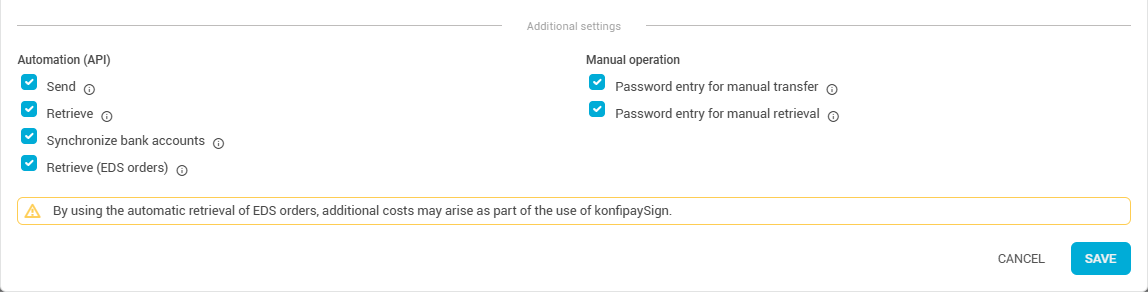
Automation settings
In the lower section of the editing window, you can specify whether the automation should be activated for the EBICS contact, and if so, for which actions. This is necessary if, for example, konfipay is to automatically retrieve account transactions at regular intervals. This setting can be changed at any time.
If you want to activate the automation, the EBICS password for the EBICS key must be saved. If this is not yet the case, you will be prompted to enter the EBICS password for the key before saving so that it can be saved.
On the right-hand side under Manual operation, you can specify whether the saved EBICS key password should still be required to be entered for manual actions such as retrieval and transfer.
The options “Password entry for manual transfer” and “Password entry for manual retrieval” determine whether the users in your client should be required to enter the EBICS password when manually transmitting or retrieving files: If the checkboxes for “Password entry for manual transfer” or “Password entry for manual retrieval” are checked, the users in your client must authenticate themselves with the password for manual actions. If the checkboxes for “Password entry for manual transfer” or “Password entry for manual retrieval” are not ticked and the password for the EBICS key is saved, the users in your client can perform manual actions without having to enter the EBICS password.
For security reasons, it is recommended to check the box for additional password entry when the password is saved.
Business transactions
The type and content of transmitted data is defined using so-called business transactions. A business transaction is characterized by an EBICS order type (EBICS 2.5) or BTF parameter (EBICS 3.0). For example, a SEPA express payment is a business transaction that is characterized by the EBICS order type CCU or the BTF parameters XCT DE URG pain.001.
To manage the business transactions for an EBICS contact in konfipay, select the EBICS contact in the list and click on Business transactions in the toolbar.
Here you will find a separate article with explanations of the EBICS order types under the EBICS 2.5 specification and their management in konfipay.
Here you will find a separate article with explanations of the BTF parameters under the EBICS 3.0 specification and their administration in konfipay.
Bank accounts
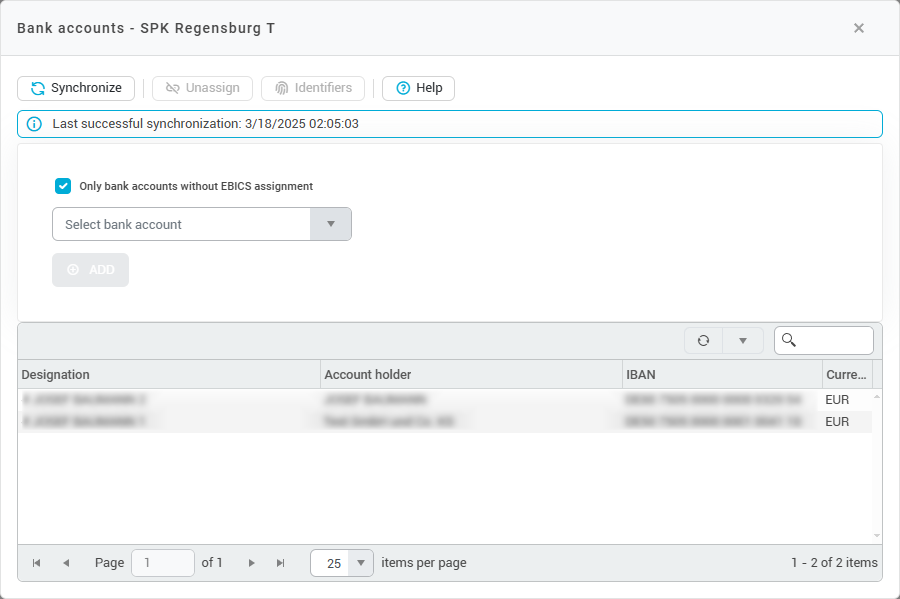
Under Bank accounts in the toolbar, you can control the assignment of bank accounts to an EBICS contact. If a bank account is assigned to an EBICS contact, you can select the EBICS contact for the manual payment transfer for this account. A bank account can (depending on the bank's configuration) be assigned to several EBICS contacts at the same time, so that you can choose from several EBICS contacts for manual payment transfers. The bank account assignment is irrelevant for file retrieval, e.g. for account transactions, as the retrieval of account transactions is controlled by the bank. It is not possible to retrieve account transactions for only a single account via EBICS.
The assignment of bank accounts to EBICS contacts is usually carried out automatically by konfipay by retrieving the account list (HTD file). In the bank account management of an EBICS contact, you can click on Synchronize to initiate the retrieval of the HTD file from the bank. konfipay then automatically assigns all accounts konfipay all accounts from the account list to the EBICS contact. Via Identifiers you can call up the identifiers of the selected bank account. Further information on identifiers and how they work can be found here.
To control the automated payment transfer (via the API) for a bank account, use the setting bank access for the corresponding bank account.
Manually assign bank account to EBICS contact
You can assign additional bank accounts to an EBICS contact by selecting the account in the drop-down list below the toolbar and then clicking on Add. If the desired account is not displayed in the drop-down list, this may be because it is already assigned to another EBICS contact. Then remove the tick from "Only bank accounts without EBICS assignment" to also display all other accounts in the drop-down list.
To cancel the assignment of a bank account to an EBICS contact, select the bank account in the list and click on Cancel assignment - then the account disappears from the list and payment files for the account can no longer be transmitted with this EBICS contact during manual payment transmission.
Manual allocation of bank accounts is only necessary in exceptions. As a rule, konfipay carries out the allocation independently using the information provided by the bank.
Protocols
When using EBICS, communication with the bank server is always logged. By selecting an EBICS contact from the list and clicking on Protocols in the toolbar, you can then open the Communication protocol, the Extended communication protocol or the Customer protocol.
Here you will find a separate article providing more information on these protocols.