Setting up an EBICS contact is simple and easy. The EBICS wizard guides you step by step through the setup process. Start the setup process by clicking on Add at the toolbar.

Enter EBICS data
In the first step of the creation process, you enter the data for the EBICS contact. The individual components are explained in the next sections.

Connection information
In the first set-up step, you must enter the data for your EBICS contact. Assign a unique name for the EBICS contact. You must know the customer ID and participant ID of your EBICS contact and enter these as well. If you do not have this information, please contact your bank.
If you do not have the host ID and the EBICS server address, you can enter the BIC or the sort code in the corresponding field and click on the search symbol to the right of it. The connection information will then be filled in automatically and a connection test will be carried out (you may still have to enter the connection information manually if your bank's EBICS server is not listed in the konfipay database).
Assign EBICS key
Then select which EBICS key you want to use for authentication. You can create a new key by clicking on the small blue "plus" symbol. Each EBICS contact is linked to an EBICS key, which is used to authenticate authorized signatories for a client. Each EBICS key is in turn protected by a key password, which you must enter in order to carry out communication via EBICS if the password for the key is not stored in the database.
Please note that you cannot easily change the assigned EBICS key once the EBICS contact has been initialized. To be able to use a different key, the contact must be reset and reinitialized by the bank.
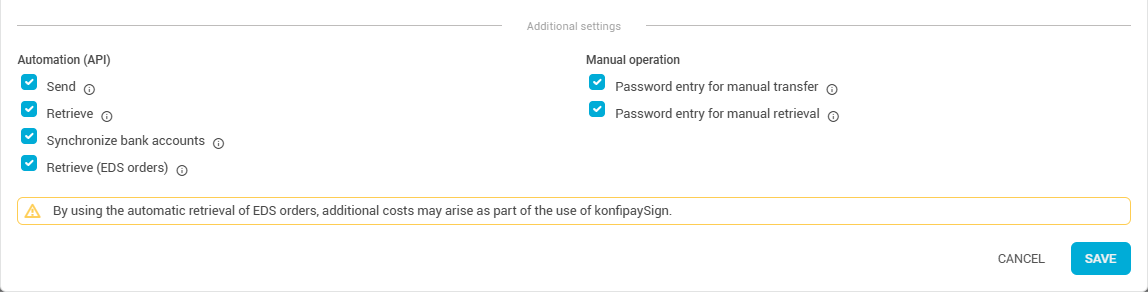
Automation settings
In the lower section of the editing window, you can specify whether the automation should be activated for the EBICS contact, and if so, for which actions. This is necessary if, for example, konfipay is to automatically retrieve account transactions at regular intervals. This setting can be changed at any time.
If you want to activate the automation, the EBICS password for the EBICS key must be saved. If this is not yet the case, you will be prompted to enter the EBICS password for the key before saving so that it can be saved.
On the right-hand side under Manual operation, you can specify whether the saved EBICS key password should still be required to be entered for manual actions such as retrieval and transfer.
The options “Password entry for manual transfer” and “Password entry for manual retrieval” determine whether the users in your client should be required to enter the EBICS password when manually transmitting or retrieving files: If the checkboxes for “Password entry for manual transfer” or “Password entry for manual retrieval” are checked, the users in your client must authenticate themselves with the password for manual actions. If the checkboxes for “Password entry for manual transfer” or “Password entry for manual retrieval” are not ticked and the password for the EBICS key is saved, the users in your client can perform manual actions without having to enter the EBICS password.
For security reasons, it is recommended to check the box for additional password entry when the password is saved.
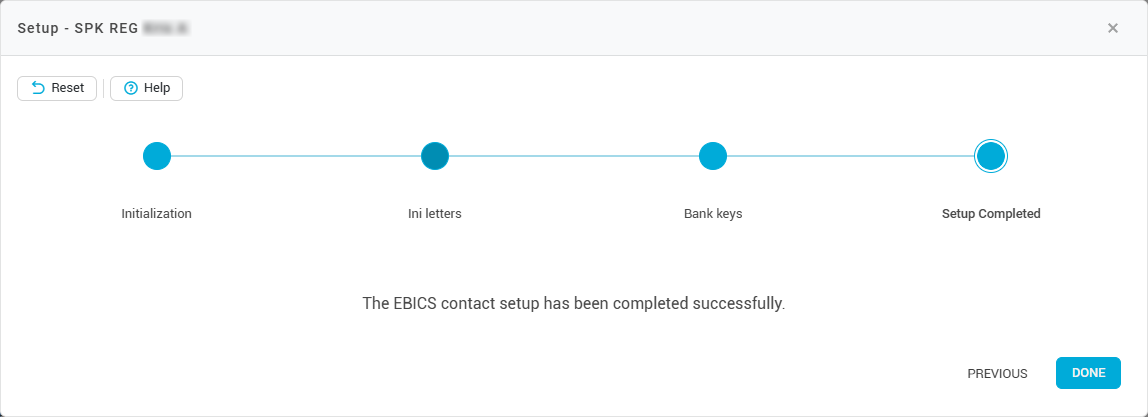
Initialize contact
In the next step, you must initialize the EBICS contact. In this step, konfipay makes contact with the bank's EBICS server for the first time. konfipay transmits the previously selected EBICS key, which it will later use to identify itself to the bank for each EBICS communication. The EBICS key is transmitted to the bank system. To do this, click on Initialize contact. If necessary, you will need to enter your EBICS key password here.
Download Ini letters
Once initialization has been completed, you must download the so-called Ini letters (or initialization letters). The ini letters are required by your bank in order to verify the authenticity of your previously transferred key.
Print out the letters and sign them. Send the manually signed Ini letters to your bank (e.g. by fax). Once your bank has processed the letters, the bank will then activate your EBICS access.
Retrieve bank key
Once your bank has received the Ini letters and activated your EBICS contact, you can retrieve the bank keys here. Simply click on Retrieve bank key. Please note that this is only possible after your bank has received the signed Ini letters and has activated your EBICS contact. Depending on the bank, this process may take some time.
Conclusion
If all the previous steps have been successfully completed, your EBICS contact has now been successfully set up and can be used to its full extent.
Reset initialization
You can reset the initialization of an EBICS contact by selecting the relevant EBICS contact in the list of EBICS contacts, then clicking on Setup in the toolbar at the top and selecting Reset in the top left corner. To be able to use the contact again afterwards, you must repeat the initialization process.