
Under Payment entry, you will find two different direct debit types in konfipay (SEPA Core Direct Debit and SEPA B2B Direct Debit), recognizable by the orange direct debit forms. The form and the functionality of the view are identical for both direct debit types.
The SEPA business-to-business direct debit differs from the SEPA core direct debit in that it is only available for payment transactions between companies and allows a shorter period for chargebacks. If you are unsure, please clarify with your bank whether you are using basic or B2B direct debits.
Select the desired type using the tabs at the top of the page. The numbers on the tabs indicate how many direct debits of that type have already been saved.

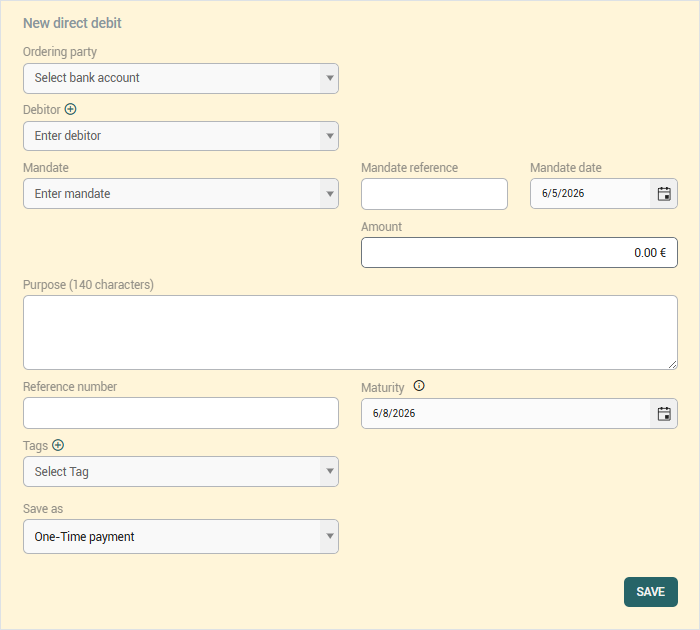
Filling out a direct debit
Start by selecting the ordering party of the direct debit from the drop-down list. The ordering party is the bank account that is to collect the direct debit. If a bank account is not displayed in this list, this means that the account does not support direct debits.
Select the debitor from the drop-down list of existing payment partners. The debitor's account details (IBAN and BIC) are then displayed to the right of the selection and are read-only in the form, so that the bank details cannot be accidentally overwritten.
If the debitor has not yet been created as a payment partner, click on the "Plus" symbol next to Debitor to create a new payment partner. If you would like to change the IBAN or BIC of an existing payment partner, select it from the drop-down list and then click on the pencil icon to edit it.
For a direct debit, you must also enter the corresponding mandate. Select the mandate from the drop-down list - if no mandate exists yet, this must first be created for the respective debitor. To do this, click on the "Plus" symbol next to “Mandate” and enter the mandate data.
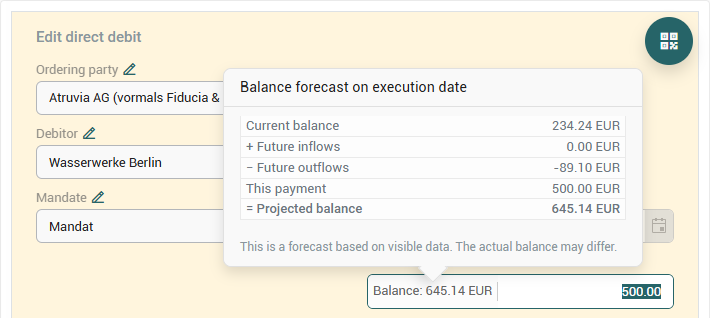
Balance forecast
Once you have selected the ordering party account and entered the amount, you will automatically see an estimate of the account balance that includes the direct debit you just entered.
The forecast takes four factors into account: the current balance of the selected bank account, other transactions already in the system, the current transaction itself, and its execution date. Based on these values, konfipay calculates the projected balance as of the execution date and breaks it down in a transparent manner (current balance, future deposits, future debits, current payment, and projected balance). If payments or account balances are in different currencies, konfipay automatically converts them where possible. Please note that this is an estimate based on visible data – the actual account balance may differ.
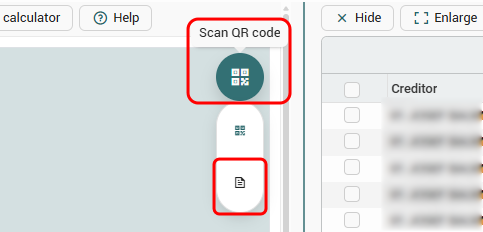
Attach PDF receipt to direct debit
For each transfer or direct debit, you can attach a related receipt, invoice, or similar documents in PDF format. This document is then directly linked to the transfer or direct debit in konfipay, so you can easily find and view it later. Only one document can be linked per payment.
To do this, click on the round icon with the QR code in the upper right corner of the transfer/direct debit form, and then click on the document icon.
In the window that opens, click Add in the toolbar to upload a new document. Then click Select files to choose the appropriate PDF file from your computer, or drag and drop the file into the window. You can also view and manage existing documents here.
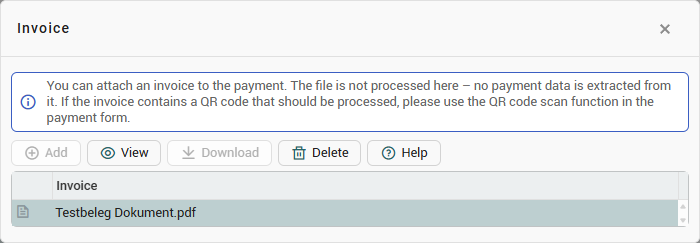
The attached receipts are not processed here; no data is extracted from them, and no payments are created automatically.
Create direct debit template
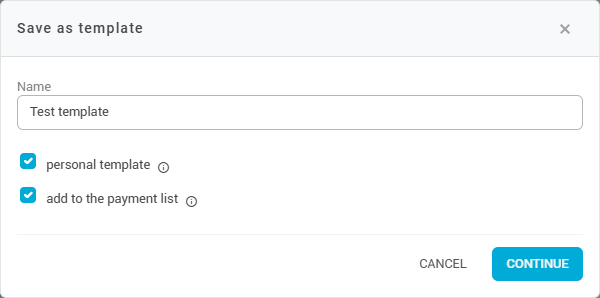
You can save a direct debit as a template by filling out the direct debit form as usual, but selecting Template at the bottom in the “Save as” drop-down menu.
Then give the template a name and specify whether it should be saved as a personal template - then, only you personally can see the template. Otherwise, all members of your client with the corresponding rights will see it.
Also select whether the template should also be added to the payment list. In this case, a direct debit file is created directly alongside the template, which appears in the payment list and can be transferred to the bank.
You can manage saved templates by clicking on the pencil icon at the top of the payment form under “direct debit templates”. You can then rename and delete templates:
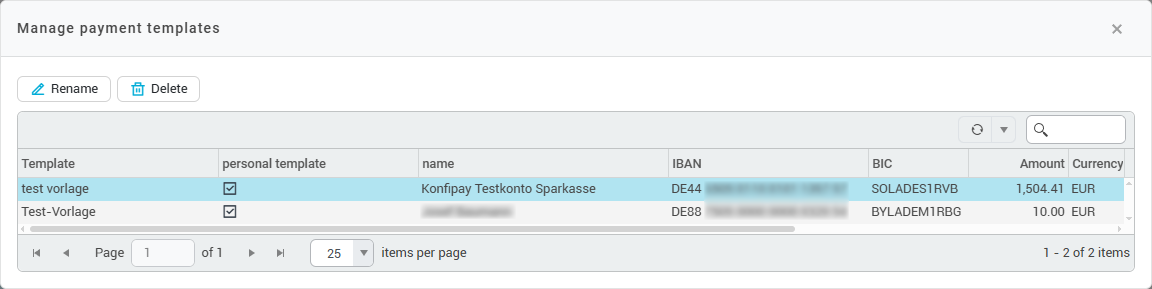
To change templates, open them in the payment form and change the corresponding data. Then click on the small arrow next to “Save” at the bottom right and select Overwrite payment template.
Recurring direct debits
If you regularly make a certain direct debit, you can also save it as a recurring direct debit. The direct debit is then created repeatedly in a set cycle.
Recurring direct debits are not executed automatically, but only created automatically. These direct debits must then be executed manually from the payment list.
To do this, fill out the direct debit form in the same way as when creating a template. At the bottom under “Save as”, select the Recurring payment option in the drop-down menu. After clicking on Save, you can further configure the recurring direct debit.
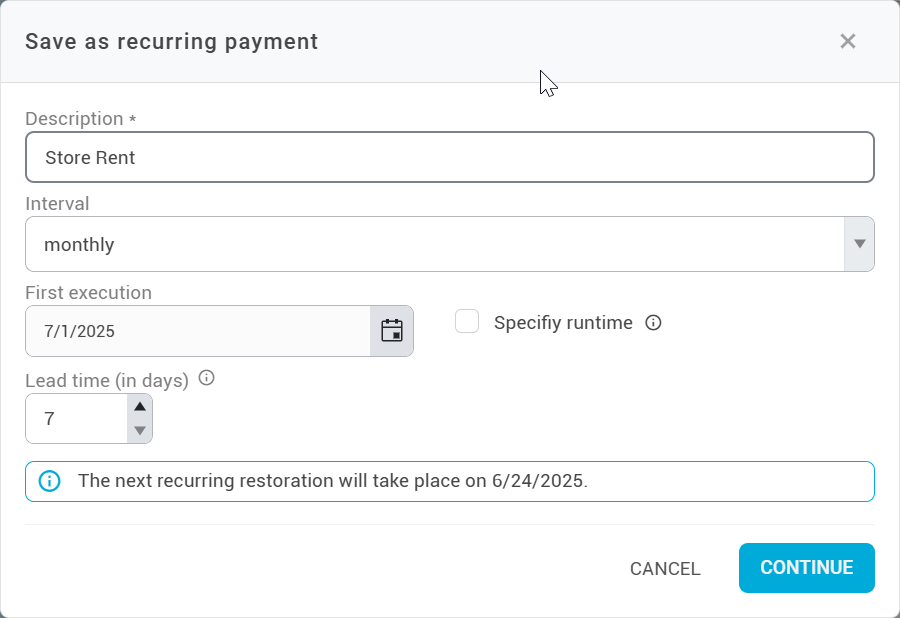
Enter a description for the recurring direct debit and specify the interval at which the direct debit is to be created. The first execution is the date on which the direct debit is created for the first time. The lead time is the period of time before the due date in which the direct debit is created. If, as in the screenshot, the first execution is on 07/01 and the lead time is 7 days, the direct debit will therefore be created automatically on 06/24.
If you specify a runtime, you can define the date up to which the recurring direct debit should be created. When the runtime ends, the recurring direct debit is deactivated and can only be reactivated manually once the runtime has been extended.
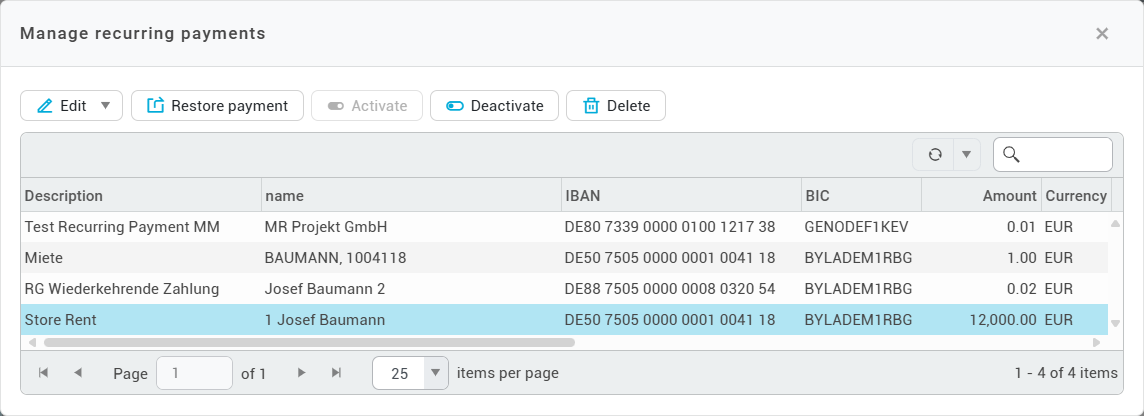
To manage your recurring direct debit, click on Recurring direct debits in the toolbar of the transfer screen. You can then edit the details of the direct debit, activate or deactivate the direct debit and delete it. With Restore direct debit, you can also immediately create a file that corresponds to the recurring direct debit.
Save direct debit as a draft
If you want to save a direct debit as a draft, you can leave the amount at 0.00 euros. When you click on Save the direct debit file is created, but not yet transferred to the bank.
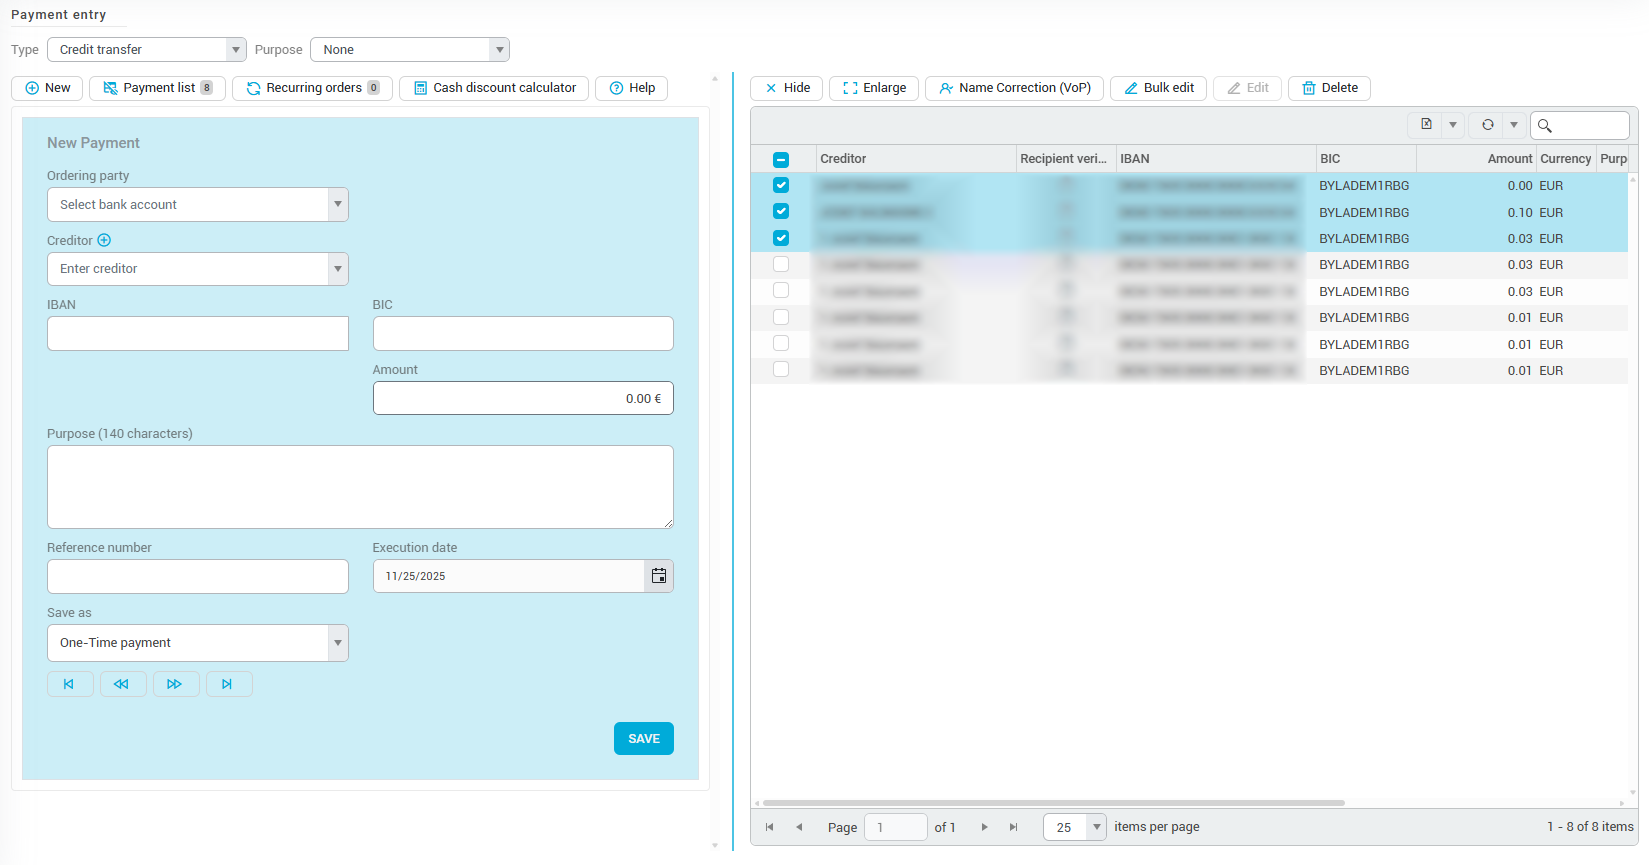
Payment list and transfer to the bank
On the right-hand side of the view is the payment list, which in this case is a direct debit list. All direct debits of the corresponding direct debit type that have been saved but not yet transferred, are displayed there. If required, you can also select the saved direct debits again and change or delete them.
You also have the option of making bulk changes, which allows you to edit a group of saved but not yet transferred direct debits at the same time. To do this, select the relevant payments and click on Bulk Edit in the right-hand toolbar. Then select the fields you want to edit by checking the corresponding boxes and enter the desired changes. These will then be applied to all selected direct debits.
To transfer manually created direct debits to the bank, visit Execute > Submit payments.
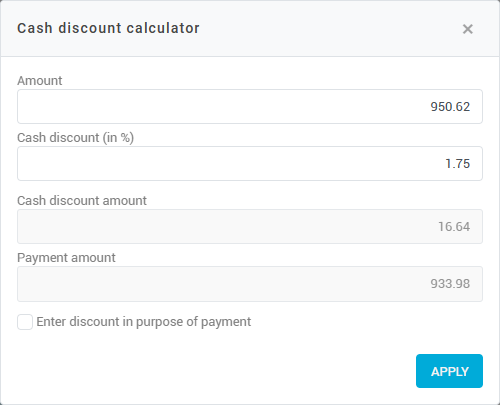
Cash discount calculator
If you would like to grant the debitor of a direct debit a cash discount, you can easily calculate the amount with the discount calculator. First click on Cash discount calculator in the top left of the toolbar. Enter the original amount at the top and the discount as a percentage below. The discount calculator then automatically calculates the discount amount and offsets it against the original amount. Click on Applyto transfer the calculated discounted amount to the amount field of the transfer.
If you work with Enter cash discount in purpose of payment checkbox, information on the cash discount will also be transferred to the reference line of the payment.
Configure view of direct debit page
Depending on your requirements, you can also hide or enlarge the direct debit form on the left-hand side or the payment list on the right-hand side.
To hide the payment list, click on Payment list in the top left-hand corner of the toolbar or on Hide in the top right corner of the toolbar. To display the payment list again, simply click again on Payment list.
To hide the direct debit form, click on Enlarge in the top right-hand corner of the toolbar. To display the direct debit form again, click on Reduce.